In my house, leftovers are a rarity. With two teenage sons living here, you can never assume that what you find in the fridge will still be there the next time you check! This, however, almost never applies to leftover rice. Rice is one of those things that you make and eat immediately. It somehow loses its appeal when reheated.
The other night I made a mushroom gorgonzola risotto. Oddly we had leftovers. Tonight I used that risotto and made a frittata. Frittata is like an omelette that isn’t folded over. It is obviously egg-based and can include many ingredients from meats, to vegetables, to cheese. It is a great dish to make if you are emptying out the refrigerator.
I had about 4 cups of leftover risotto. This can also be made with leftover white rice.
In a large nonstick skillet heat 3Tbsp olive oil and add the risotto in a single layer. Allow to heat through on medium heat for about 15 minutes. In the meantime, beat 6 large eggs and season with salt and pepper to taste. When the risotto is heated through and has a nice crust on the bottom, add the beaten eggs to the skillet and gently nudge and lift the rice so that as much of the eggs seep through. Make sure to get the edges. At this point, you have two options: A. the heat can be lowered to medium-low and the skillet can be covered and the frittata will continue cooking or B. you can invert the frittata onto a large round dish and slide it back into the skillet to allow the top to finish cooking, without the need to cover. Unless you know what you are doing, I would go with option A. I found out the hard way that I am not well-versed in frittata inversion, and let’s just say that cleaning up frittata is not as fun as actually eating it!
For some reason, chickpeas were not ever on my list of favorite things to eat. My mom would make them often in a sort of stew with potatoes and red sauce, and those were the nights I inevitably had cereal for dinner. Turns out these uniquely shaped little beans grew on me…especially with my discovery of hummus. Tasty and versatile, they are also very good for you, as they are rich sources of vitamins, minerals and fiber…not to mention protein.
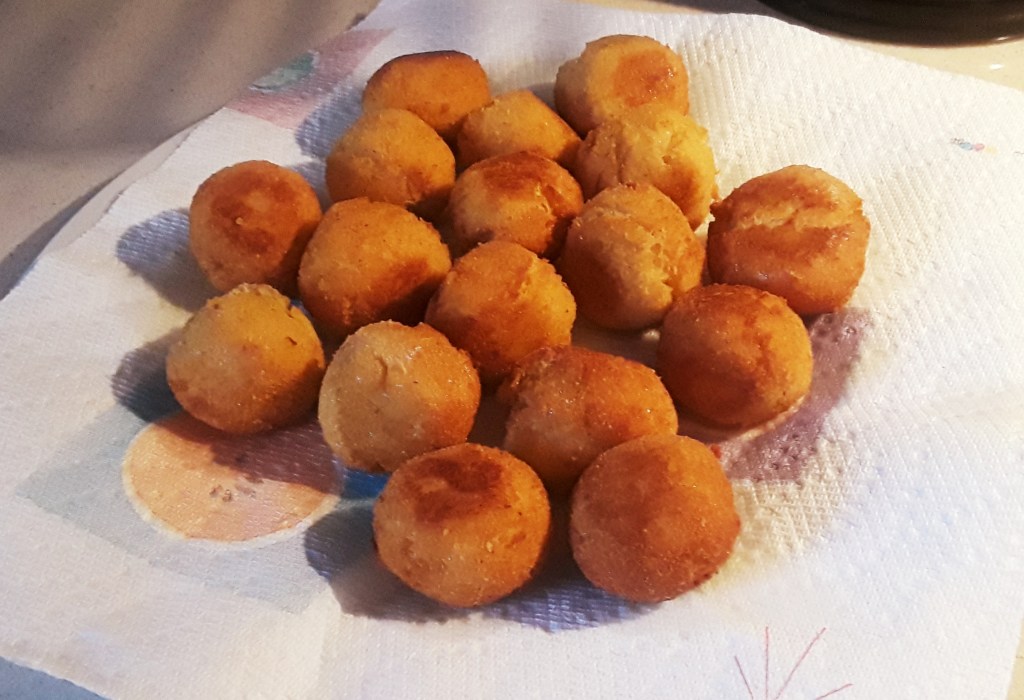
In English, the word “polpetta” translates to “meatball”, but it can also refer to any round assembly of ingredients where no meat is included. One of my husband’s Italian colleagues was kind enough to forward this recipe to me from the website http://www.cucchiaio.it.
Drain and rinse one 15oz can of chickpeas and add to the bowl of a food processor with a good drizzle of olive oil and and a dash of salt. Process until a smooth paste forms. If too thick, add a drizzle of water. Pour the mixture into a medium bowl and add 1/4c Pecorino Romano cheese, 1 large egg and a dash or two of black pepper. Mix well to combine. Then take small amounts and gently form into balls. If the mixture is too moist, feel free to add a dusting of dried bread crumbs and incorporate well. For easier handling, I also lightly wet my hands with water before forming the balls. In a small bowl add 1c dried bread crumbs and gently coat each ball before frying in a small skillet in vegetable oil. Frying time is less than five minutes. They just need to be golden brown. Drain on paper towels. I made about 17. They were great with a dab of plain Greek yogurt, if you have any on hand.
I could have eaten all of them by myself. Needeless to say I shared. Next time I may not be so nice!
Pizza is the universal word for “delicious”. It is one of those foods that I never grow tired of. I will eat it with just about any topping except for anchovies (no hairy fish for this chick) and pineapple (emphatically NO). While there are many places that make one heck of a pie, nothing is like homemade pizza.
Until recently, I have never attempted to make pizza at home. The issue for me is the yeast. You could say that I have a yeast phobia. I see yeast in the ingredient list, and I just turn the page.
But then my mom gave me her recipe for pizza dough and I thought, what is the worst that can happen? I throw away some flour? So I gave it a try last year, and what do you know? It turns out that yeast isn’t so scary. In fact, not only did I make pizza…it was actually good pizza! I absolutely made it again and again. Each time it got easier and easier and the pizza was better and better. Before you know it, I had conquered my fear of yeast…kind of.
Yesterday was Pizza Day:
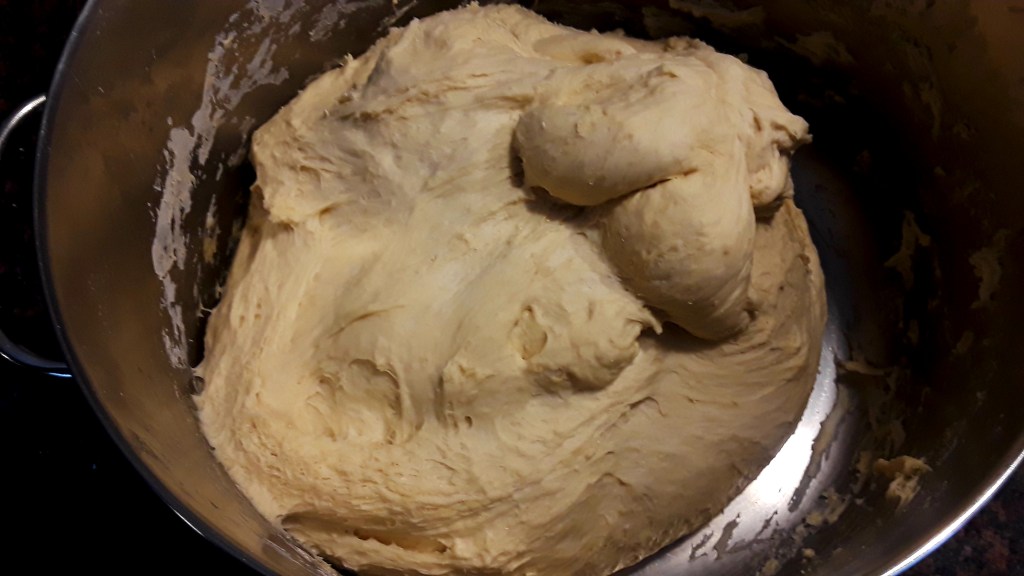
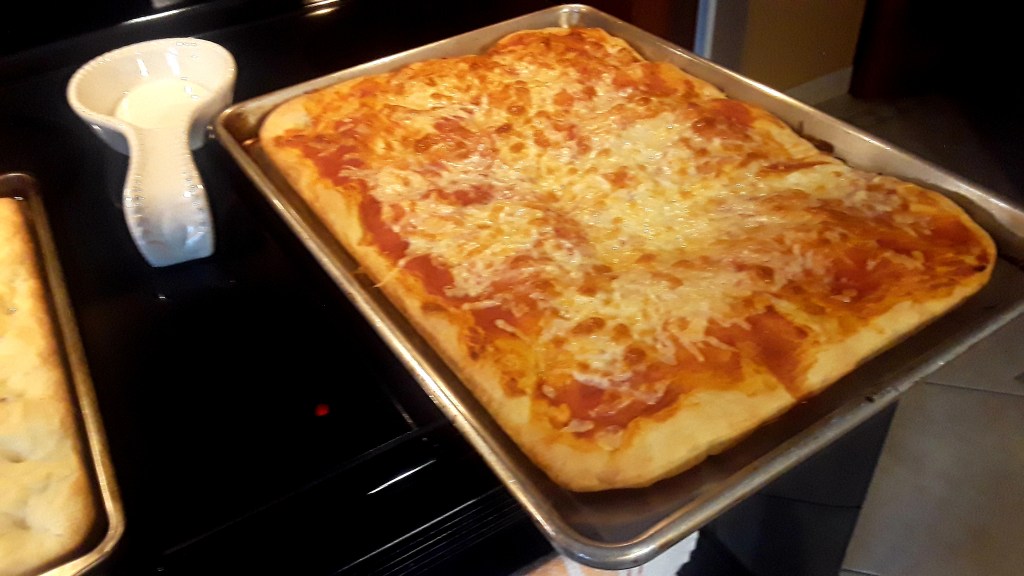
I used one 5Lb bag of all purpose unbleached flour (if you are going to make pizza…might as well make enough for leftovers), 1tsp sugar, 1Tbsp salt, 1c whole milk, 2 large eggs, 3 envelopes yeast (not fast acting), 4c warm water, 4Tbsp olive oil. I mixed the dry ingredients in a large pot. Then I dissolved the yeast in the warm water and added it to the dry mixture along with the oil, eggs, and milk. Knead the dough for about 10 minutes. If it is too dry add small amounts of warm water. You want the dough to be somewhat elastic and easily pull away from the sides of the container you are kneading it in. It should also easily pull away from your hands. Then cover the dough with a clean cloth and set it in a warm place. Set a timer for two hours and then uncover the dough and push it down in the pot. Re-cover, and allow to rise again for another 2 hours in a warm place. I let the dough rise at two hour intervals three times. The more you allow the dough to rise, the better the crust on your pizza will be. Make sure you cook the pizza in a preheated 450 degree oven. To ensure the cheese doesn’t burn, allow the pizza to cook for about 10 minutes with just sauce and then add mozzarella and any other toppings and allow to cook for another 5 to 10 minutes.
Pizza dough before first proof.
While I have somewhat conquered my fear of yeast, I am still reluctant to venture too far into the unknown. For now, I will concentrate on pizza…who knows, maybe next year it will be bread.
One of the most dreaded tasks was helping to clean rapini. As a kid, I remember coming home from school to find paper sacks filled with them. This meant my mother had hit the jackpot in some farmer’s field that day and that my assistance was now required. Lovingly known as “highway weeds”, these little gems could tie you up for hours. It takes patience and time to go through each one and cut away the tender leaves and buds from the larger, fibrous stalks. If the stalks are small, they can easily be eaten whole. They then need to be rinsed (many times to remove any loose dirt), blanched in batches, cooled, and portioned into individual freezer bags.
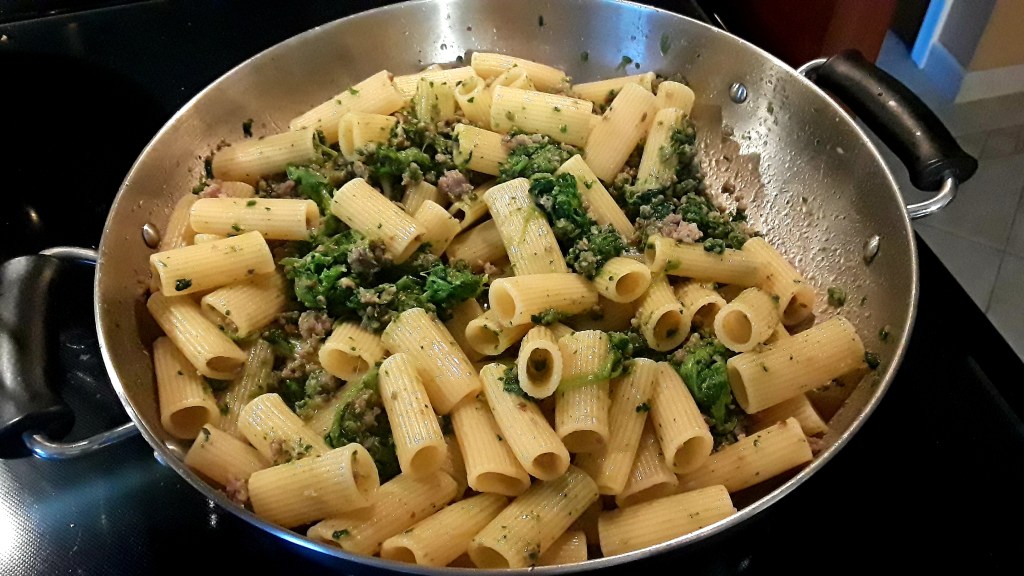
The somewhat bitter taste of rapini can be a bit of a turn off. But they are the best accompaniment to fried chicken cutlets…especially in a sandwich. They actually accompany any meat quite well. They are a great source of vitamins, especially Vitamins A and K. They are also absolutely fabulous with sausage and pasta…one of my favorite dishes!
So to begin, clean and rinse a nice bunch of rapini. Thankfully, you can now find them in most grocery stores! Boil water in a medium pot and blanch the rapini for about 10 minutes. They don’t really need to cook through, they just need to get soft and tender. Using a strainer, remove the rapini and allow to drain. Keep the water that you used to blanch the rapini because you will use it to cook your pasta. Then in a large skillet, heat 3Tbsp olive oil and a large clove of garlic on medium heat. When the garlic becomes fragrant, remove it from the oil. Add 1Lb crumbled pork sausage and break it up well. When the sausage is just about cooked through, deglaze the skillet with 3/4c white wine. Season to taste with salt and pepper and allow the wine to cook down, about 15 minutes. Remove as much of the water from the rapini as possible and add them to the skillet with the sausage. Stir well. Allow to simmer for about 5 minutes and remove from heat. Cook the pasta according to package instructions and add it directly to the skillet when it is al dente. Reserve some cooking water to add to the pasta if needed. Add a generous drizzle of extra virgin olive oil and give a good toss. Serve with plenty Parmigiano. To note…this dish is typically prepared using Orecchiette pasta…but good luck trying to find that at the grocery store these days…so Rigatoni it is!
Whenever I eat this pasta, I remember standing next to my mom, knife in hand, going through the bag of “weeds” that never seemed to end. Who would have thought that the chore I never looked forward to would be the one I would remember most fondly?
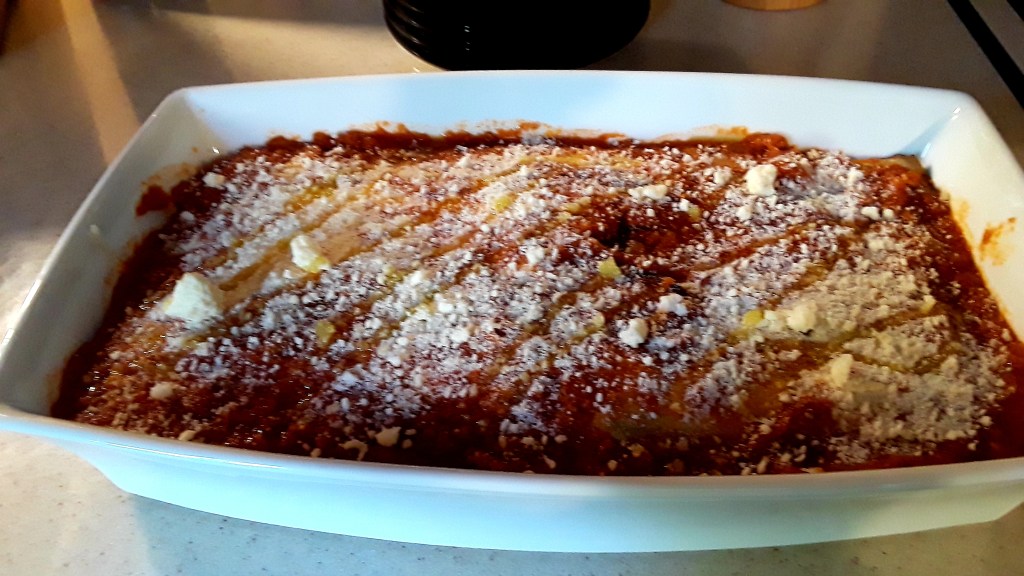
Although by definition eggplant is a fruit, it is primarily prepared as a vegetable. It is abundant in any self-respecting Italian’s vegetable garden…and even more abundant in their recipe repertoire. There is so much that you can do with eggplant. They can be stuffed, stewed, fried, baked, grilled, marinated and pureed (I think I got them all). Probably one of their most well known uses is in Eggplant Parmigiana.
This dish is an excellent way to prepare eggplant. The basic ingredients are eggplant, tomato sauce, and mozzarella. The eggplant is peeled and sliced longways. The slices should be no more than 1/4″ thick. Place the slices on a cookie sheet lined with parchment paper and drizzle with olive oil and sprinkle on some salt. Bake at 400 degrees for about 20 minutes…until the slices begin to brown and soften. Remove from oven and allow to cool.
Assembling the Parmigiana is easy. I typically use an 8×12 baking dish. Drizzle the bottom of the dish with olive oil. Begin with a layer of eggplant slices. Cover the slices in sauce (not too much) and sprinkle on mozzarella (no such thing as too much). I also add a dusting of Parmigiano cheese for good measure. Add another layer of eggplant, tomato sauce, and mozzarella. Keep going until the eggplant is gone. The top layer does not require mozzarella, instead I usually add a good dusting of Parmigiano and a drizzle of olive oil. Bake at 350 degrees until browned and bubbling…45 minutes to an hour. Remove from the oven and allow to rest for 5 minutes or so before attempting to cut. (For this particular recipe I used 3 medium sized eggplant and about 3 cups of tomato sauce I already had on hand).
I have to say that I try very much to eat food that is in season so that I can buy as local as possible. Eggplant are obviously not in season in April, but going to the grocery store these days is a game of “Make Whatever You Can With Whatever You Find”, soooooo Eggplant Parmigiana it is!
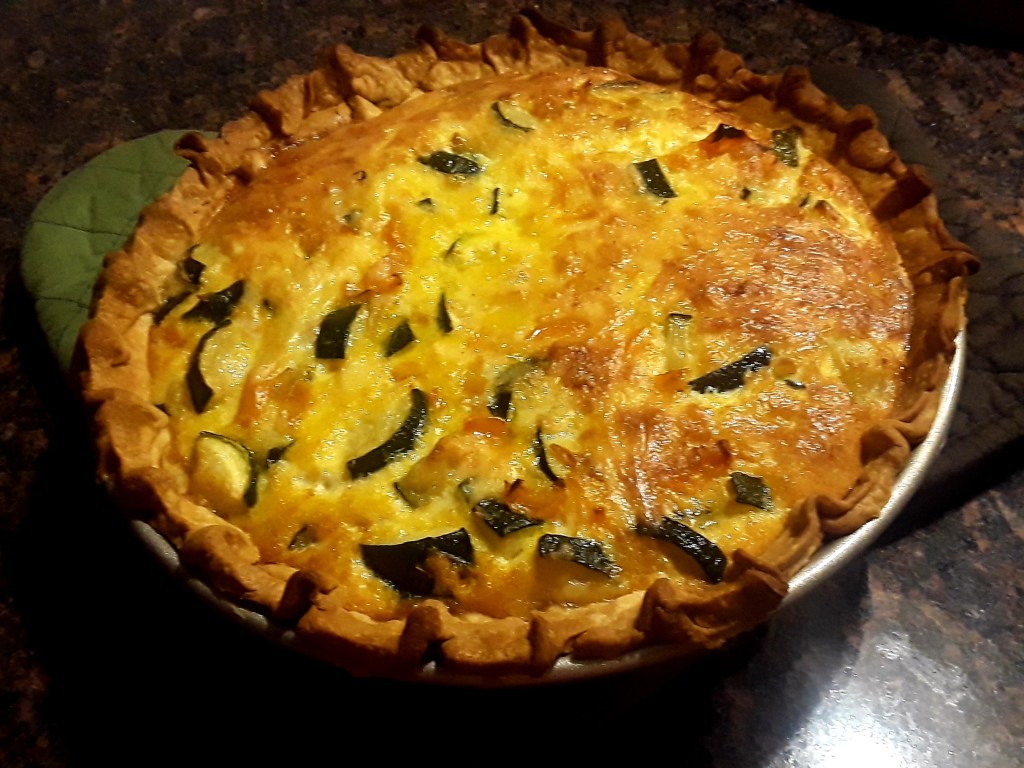
One of my favorite things to make and eat is a hearty quiche. This has got to be one of the easiest dishes to prepare and it can be made with anything you have on hand. Tonight I had some zucchini that looked like they were just a tad neglected in the vegetable drawer of my refrigerator. I grabbed a yellow pepper and a small yellow onion. After chopping the vegetables, I sautéed them in 3Tbsp of olive oil until they were soft. I added some salt, pepper, and garlic powder to taste. I took the pan off the heat and let the veggies cool a bit. In the meantime, in a large bowl I beat 5 large eggs with 1/2c half and half (only because I was out of heavy cream which is waaaayyyy better). To the egg mixture, I added 1/4c grated Parmigiano and about a cup of shredded cheddar cheese; then I seasoned with salt and pepper and added the cooled vegetables. I gave a good mix to coat the vegetables and poured them into a prepared pie crust in a deep pie dish. I put this little beauty in a 400 degree preheated oven for 15 minutes and then lower the oven temperature to 350 degrees and allow the quiche to bake for another 40 minutes.
After a heavy Easter meal yesterday, this evening’s dinner is going to be a nice slice of quiche, a good salad, and a glass of wine…Buon Appetito!
To say that this Easter is going to be like no other is definitely an understatement. From not being able to go to Church, to not being able to gather with extended family and friends…all of it just seems incredibly wrong. The push to “make the best of it” is honestly starting to wear thin. But what else can you do?
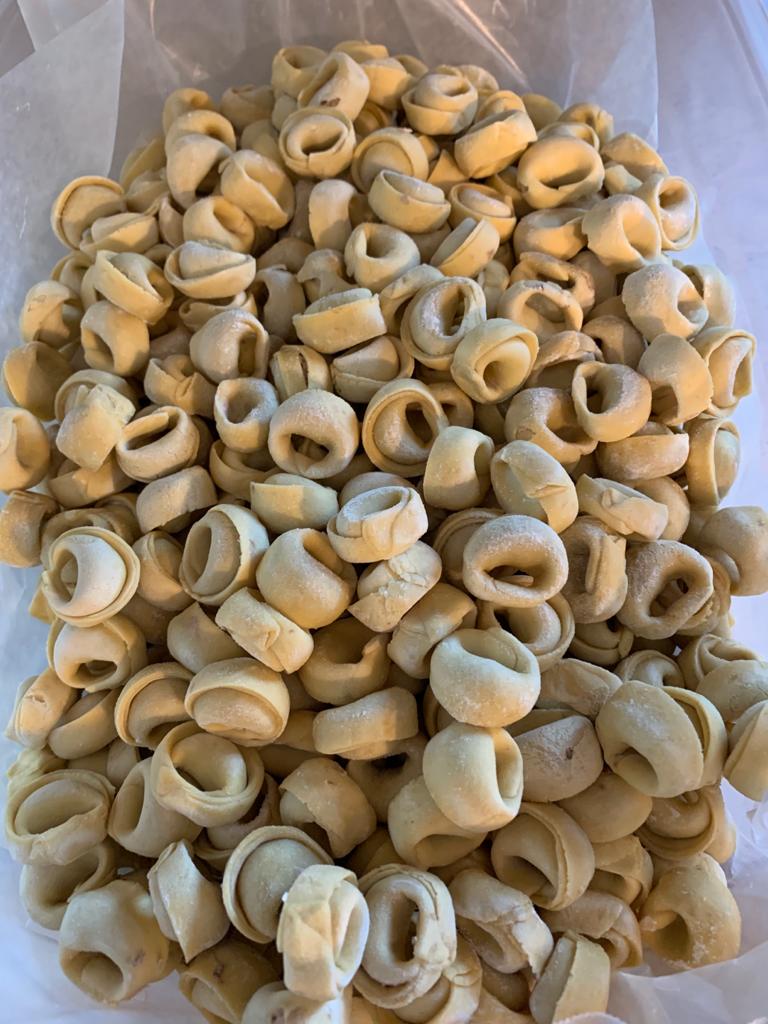
Yesterday I decided that since I have nothing but time on my hands, I was going to make some homemade tortellini. These small rings of pasta can be stuffed with a blend of cheeses or a blend of ground meat. They can be served in a broth, with a red meat sauce, or with a white cream-based sauce. There really isn’t a bad option…they are all great!
Now while making pasta is fun, these little suckers are a true testament to patience and endurance. Making them should not be attempted by the weak-hearted. After I completed the first twenty or so, I remembered why I have only made them twice before….buying them already prepared is definitely the saner option! And although it took me the better part of the day to finish the task, I have to say that once I found my groove…it wasn’t so bad.
Needless to say tortellini will be the main attraction at this year’s Easter dinner. I will probably make a quick meat sauce (I have some ground meat left over from the stuffing for the tortellini that will work nicely) and then a gorgonzola sauce. The rest of the meal is going to be a Finger Food Fest of hard and soft cheeses, charcuterie, fruits, nuts, and whatever else I find in my pantry that I feel like adding to the table. Dessert will include a New York Style Cheesecake and Chocolate Dipped Shortbread Cookies all made by yours truly.
While I am beyond grateful for all that I have this Easter – health, a safe home, family, and plenty of food – I will miss all of the normalcy of Easters passed. Tomorrow I will sit at the table with my husband and my sons, I will pour myself a glass of wine, and I will drink to all the blessings before me and give a special shout out to the better days that are sure to come.
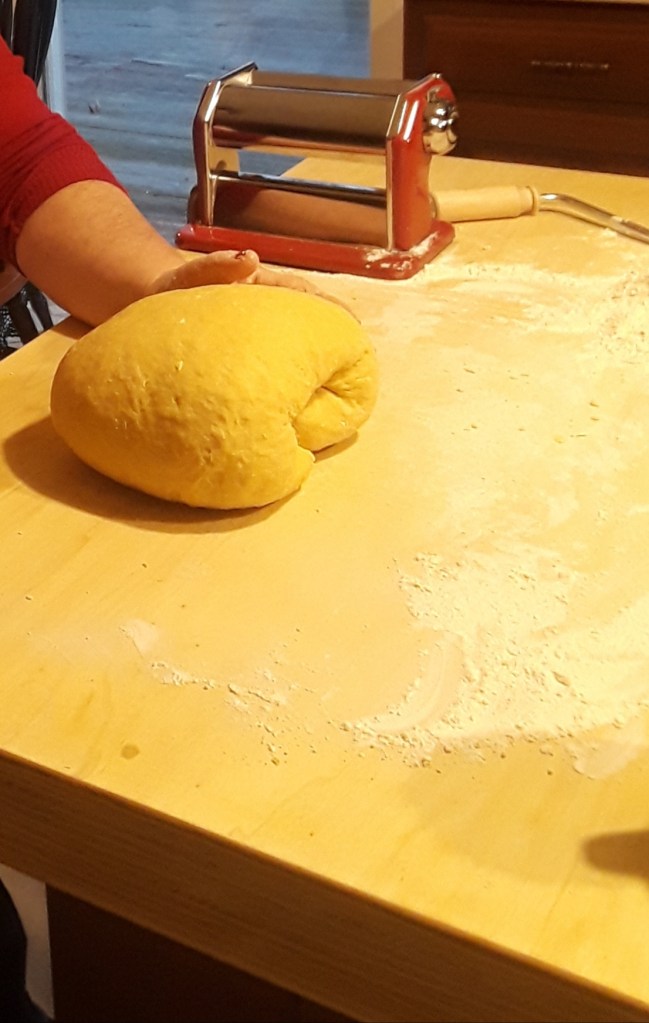
If you were privileged enough to grow up in an Italian household, you are well-acquainted with the pasta board. This basic sheet of wood, akin to a giant cutting board, existed for the sole purpose of making pasta. It was the seasoned work surface from where a simple mound of flour with eggs was transformed into the wonders of fettuccine, spaghetti, lasagna, ravioli, tortellini, cappelletti, and so on and so on.
When I was little, my mom made homemade pasta almost every week. Her pasta machine had some serious miles on it! Once that baby was fastened to the edge of the pasta board, it was time to get cranking! The hand crank made an undeniable sound as the pasta was fed through the machine’s rollers and flattened, stretched, and shaped. As a child, it was always fun to be the one whose job it was to turn the crank and watch the pasta sheets come out the other end of the rollers. It was even more fun turning it as fast as you could to see how quickly the sheets rolled through…though my mother was always less than amused.
Today, I have my own pasta board. Mine is on the fancy side as my father fashioned it to slide over one end of the island in my kitchen like a sleeve. I have to say that whenever I attach my little red pasta machine to the one end, I am instantly transported back to my mom’s kitchen where I eagerly knelt on a chair watching the whole process and waiting to do my job…and it is now my boys who eagerly watch and wait.
During this time of quarantine, my pasta board has certainly seen some action. Now I am not going to lie…the process is messy. Your hands will get dirty and the floor will be dusted with flour. You will question if what you are doing is right. But I promise that the taste and texture of fresh homemade pasta is well worth the effort (and mess). There is no comparison between a lasagna made with homemade pasta sheets and one that is not. Homemade spaghetti or fettuccine cook in 2 to 3 minutes and make any sauce 100 times better.
To make homemade pasta you will need : 3 3/4c all purpose flour (unbleached), 4 eggs, and a drizzle of olive oil. Starting off with less flour is better, because you can always add more. Begin with a mound of flour and a well in the center (built in bowl!). Break the eggs directly in the well, add the olive oil, and beat with a fork. Slowly add the flour to incorporate, and then get your hands dirty. Knead the dough by pushing with the heels of your palms. Fold the dough onto itself and continue kneading until the dough is uniform and elastic. Cut into smaller quarters so that it can be rolled easily. Keep the sections not being used in plastic wrap or under a bowl. When rolling the dough through the pasta machine, begin with one piece of dough through the widest setting first. Roll it through 2 to 3 times before adjusting the rollers to thinner settings. Be sure to dust with flour before proceeding with each roll setting. I usually stop at the second to last setting for ribbon pasta. Allow the long sheets to lightly dry before cutting the pasta into shapes with the pasta machine. I typically lay the long sheets on a kitchen table covered with a table cloth and proceed cutting when all of the dough has been rolled into thin sheets.
Gone are the days where pasta-making was a weekly endeavor. And unless your Mamma or Nonna are still around, the chances of having a pasta board are slim to none. But if you are fortunate enough to at least own a pasta machine, don’t be afraid, take her out, and go for a spin.
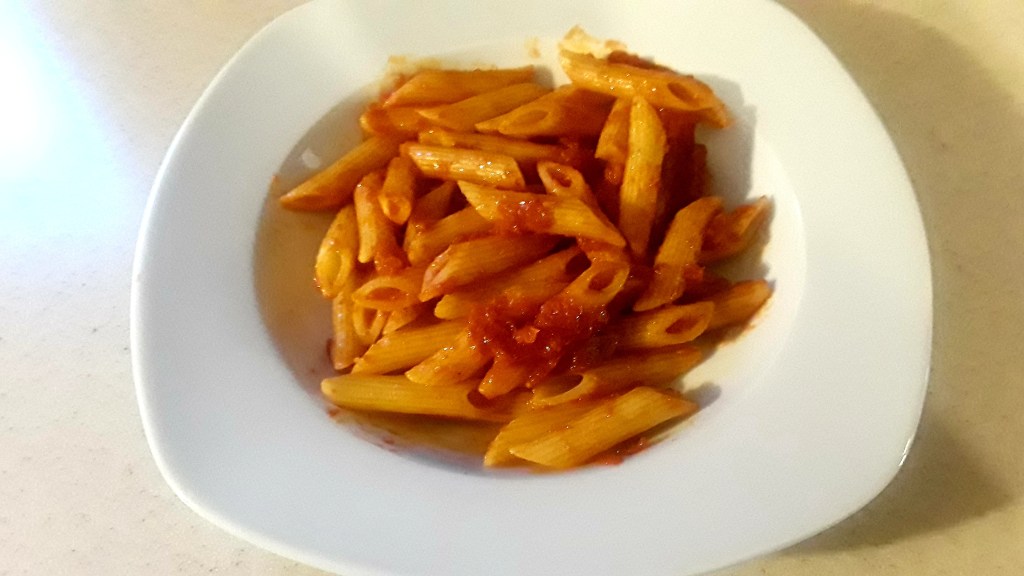
In Italian, “arrabbiata” means angry or irate. In regard to the mood of many people these days, it is quite fitting.
In the food sense, “arrabbiata” refers to a spicy tomato sauce. It is beyond easy to make, and you definitely have all of the ingredients in your pantry.
Begin with two cloves of garlic, finely minced. Gently sauté in 4 to 6Tbsp olive oil over medium heat in a large sauté pan for about 1 minute. Do not let the garlic brown. Add 1Tbsp red pepper flakes and 1 28oz can of crushed tomatoes. Season to taste with salt and pepper. Stir, cover, and bring to a slow simmer for about 15 minutes. Cook 1lb penne pasta according to package directions. Drain well and add directly to the sauce. Give a good stir to coat the penne and serve with plenty of Parmigiano.
I am not a big fan of spicy food, but I make an exception when it comes to this pasta sauce. It is fresh, quick, and it does not disappoint!
While the mood of the world these days teeters between fear, anger, sorrow, and uncertainty, at least allow the luxury of indulging yourself in time spent with family over a good meal. The craziness of everyday life will return…I know it.
I know many people who literally cannot eat if they are upset or anxious. When nerves run high, food is the last thing on their mind.
Are. You. Kidding. Me?!
For me, there is definitely a comfort that only food can bring. I have many a time taken a nose dive into a bag of Doritos. I am thrilled to report that there is no shame in eating Nutella right out the jar with a spoon. And anyone who grew up in an Italian household will tell you that there is absolutely nothing more comforting than slowly sipping a warm bowl of pastina made just for you by Mamma or Nonna. For me…it isn’t just the actual act of eating the food that brings comfort…it is also the act of preparing the food. No matter what is going on, focusing on a task…even one as mundane as cooking dinner, gives you purpose. Purpose is comforting.
In the midst of all this craziness that is going on in the world around us…what is the one thing that people are still doing? They are cooking (some more than they have ever cooked in their lives). They are sitting down and eating dinner with their families. They are trying new things. They are doing the mundane to keep their minds off the uncertainty and horror and sadness around them.
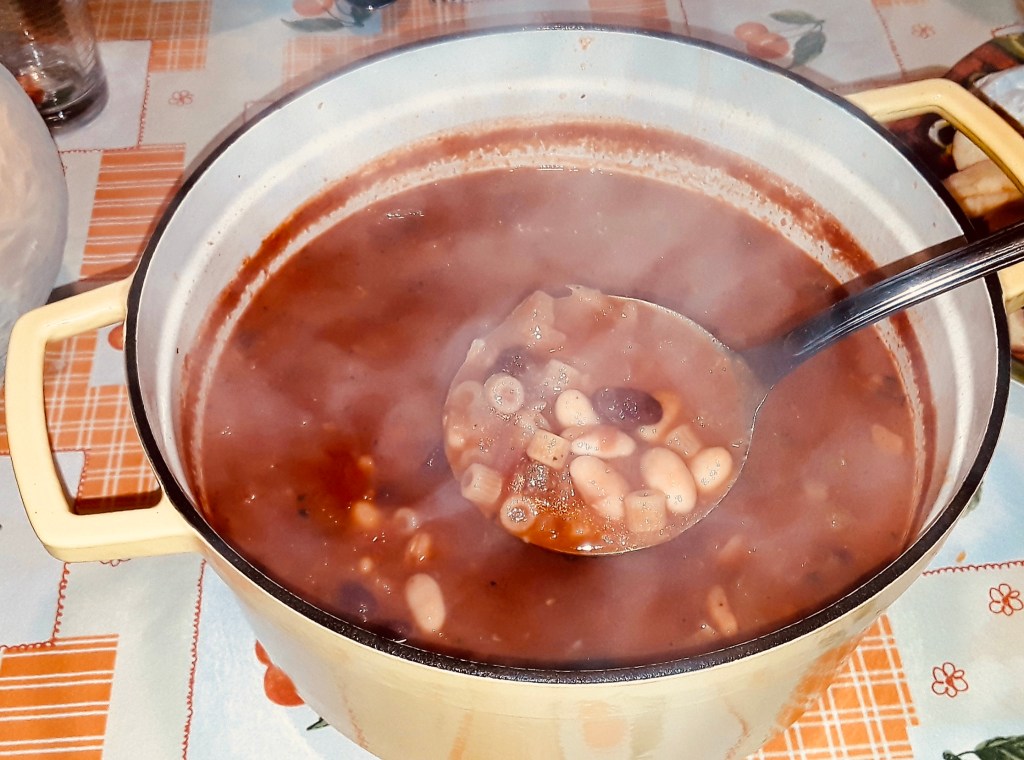
When I was growing up, I had a lot of “American” friends. There was always a certain thrill to being invited to their house for dinner. Things my parents considered “American’ food like frozen, boxed, or canned meals were not as much foreign as they were almost forbidden. Having boxed mac and cheese was about as processed as we were allowed, and it was like a national holiday when we actually got to eat it! As a kid,”Pasta e Fagioli” somehow just didn’t have the same appeal as a hot dog or frozen fish sticks.
Fast forward to being a grown up and now it’s the hot dogs and fish sticks that lack appeal and the Pasta e Fagioli that call my name. This classic Italian soup is easy to make, healthy to eat, and as comforting as they come.
Begin with 4oz of diced pancetta or bacon. Cook on medium heat in 2Tbsp olive oil in a Dutch oven until browned or crispy. Remove the pancetta from the pot and drain on a paper towel. Set aside. Then add 1 chopped medium yellow onionto the oil in the pot and saute until soft. Add 1tsp dried Italian seasoning and 1/4 tsp dried red pepper flakes. Next, add two finely minced garlic cloves and cook for 3 minutes, stirring often. Deglaze with 1/4c white wine…scarping up all the bits on the bottom of the Dutch oven. Then add 1Qt chicken stock, 1 28oz can of peeled crushed tomatoes, 1c water, and 2 15oz cans of beans (I used 1 can of cannellini and one can of red kidney beans). Make sure to rinse the beans before adding them to the pot. Bring to a boil and then reduce heat to medium low, cover, and allow to simmer 30 minutes.Mix well andadd 1c ditalini pasta. Cook8 minutes and adjust seasoning with salt and pepper. When the pasta is cooked, sprinkle a good amount of Parmigiano on the soup and add the cooked pancetta.Give a good stir and serve with more Parmigiano and a loaf of crusty bread.
This soup is one of my mom’s favorites..though she puts her own spin on it. As a child, I dreaded the nights that she put this on the menu for dinner…and I would have given anything for a burger… today I would give my soul to share a bowl of this with her.
In these completely jacked up times, I hope you all find comfort in each other and in the wonderful meals you make and share… together. Buon appetito, my friends.